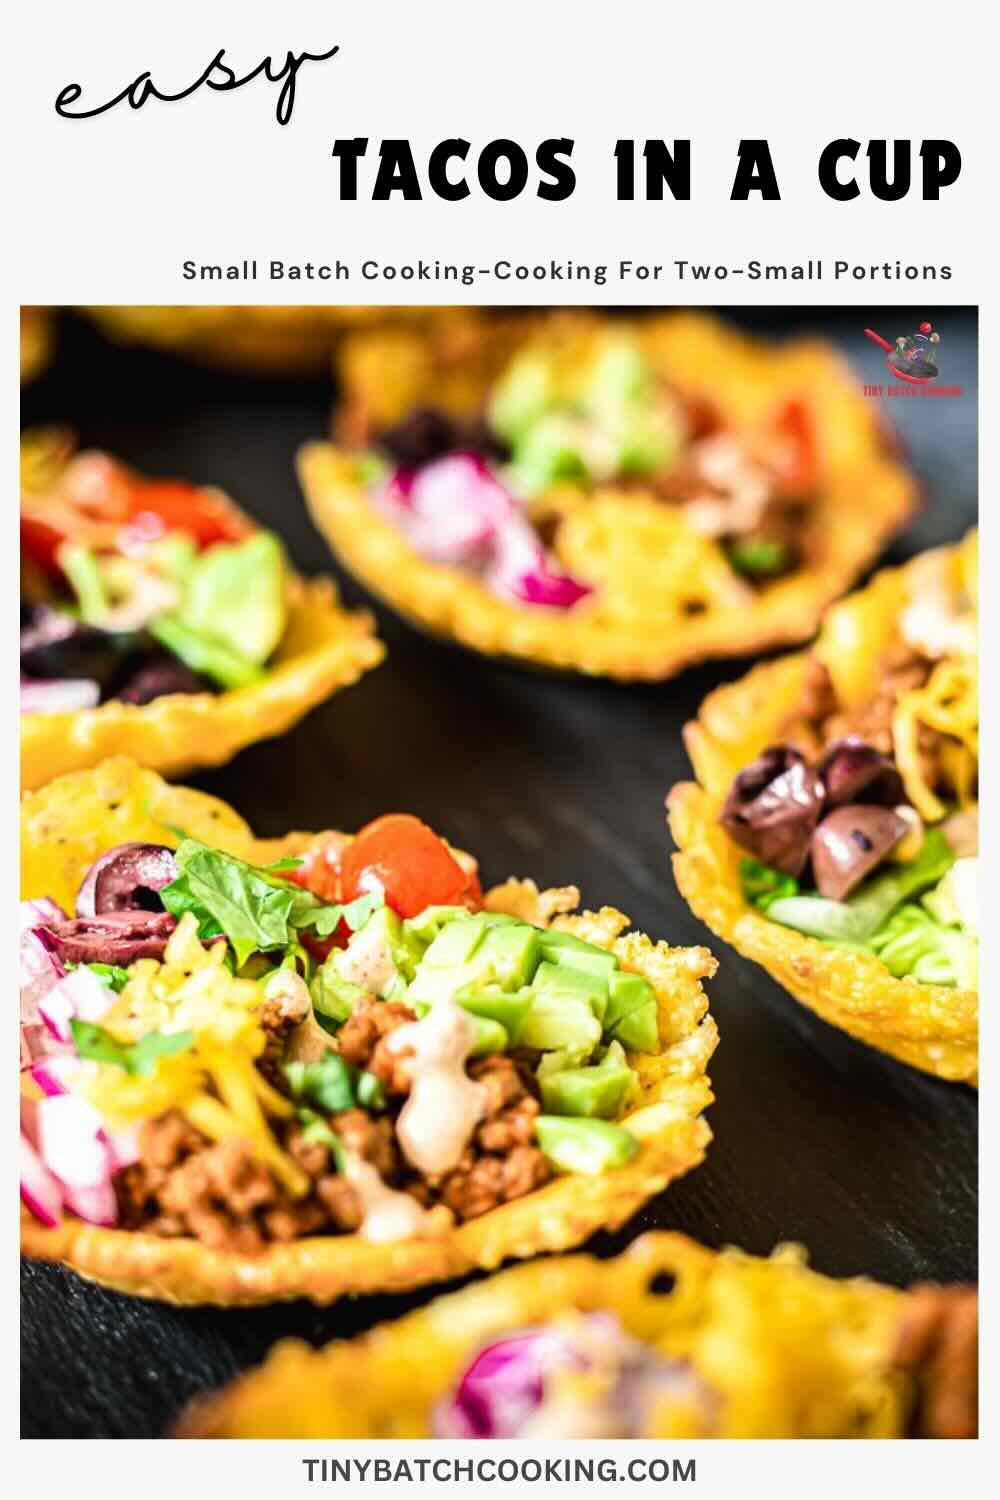
Isn’t it frustrating when you’re craving tacos, but you don’t want to end up with a bunch of leftovers or messy kitchen counters? That’s why I love this Tacos in a cup recipe. It’s the perfect solution for those of us who just want a small, satisfying batch for one or two people. Not to mention, it’s a fun twist on Taco Tuesday without the mess of traditional tacos.

I first tried this recipe on a lazy weekend afternoon when I was looking for a quick and easy snack. I didn’t want to deal with the hassle of making a whole batch of tacos and then cleaning up all the dishes afterward. These little taco cups turned out to be just the right amount of food, and they were so cute and crunchy, too.

Easy Tacos for Taco Tuesday
When Taco Tuesday rolls around, sometimes you just want a quick fix that doesn’t require tons of ingredients or cooking time. That’s where tacos in a cup come to the rescue, along with air-fried frozen onion rings. They’re a simple, tasty way to enjoy tacos without the fuss, and easy to customize with whatever toppings you have on hand. This recipe is perfect if you’re cooking for yourself or just one other person.
Making Taco Cups Crunchy
The secret to these delicious tacos in a cup is the crunchy shell. Instead of using traditional taco shells, we’re making them with a mix of mozzarella, cheddar cheese, and a little protein powder.
This method gives you that crunch of a traditional taco shell without the need for frying or dealing with store-bought tortillas. Because they’re baked in small circles, they fit perfectly into a muffin tin, creating that cute cup shape.
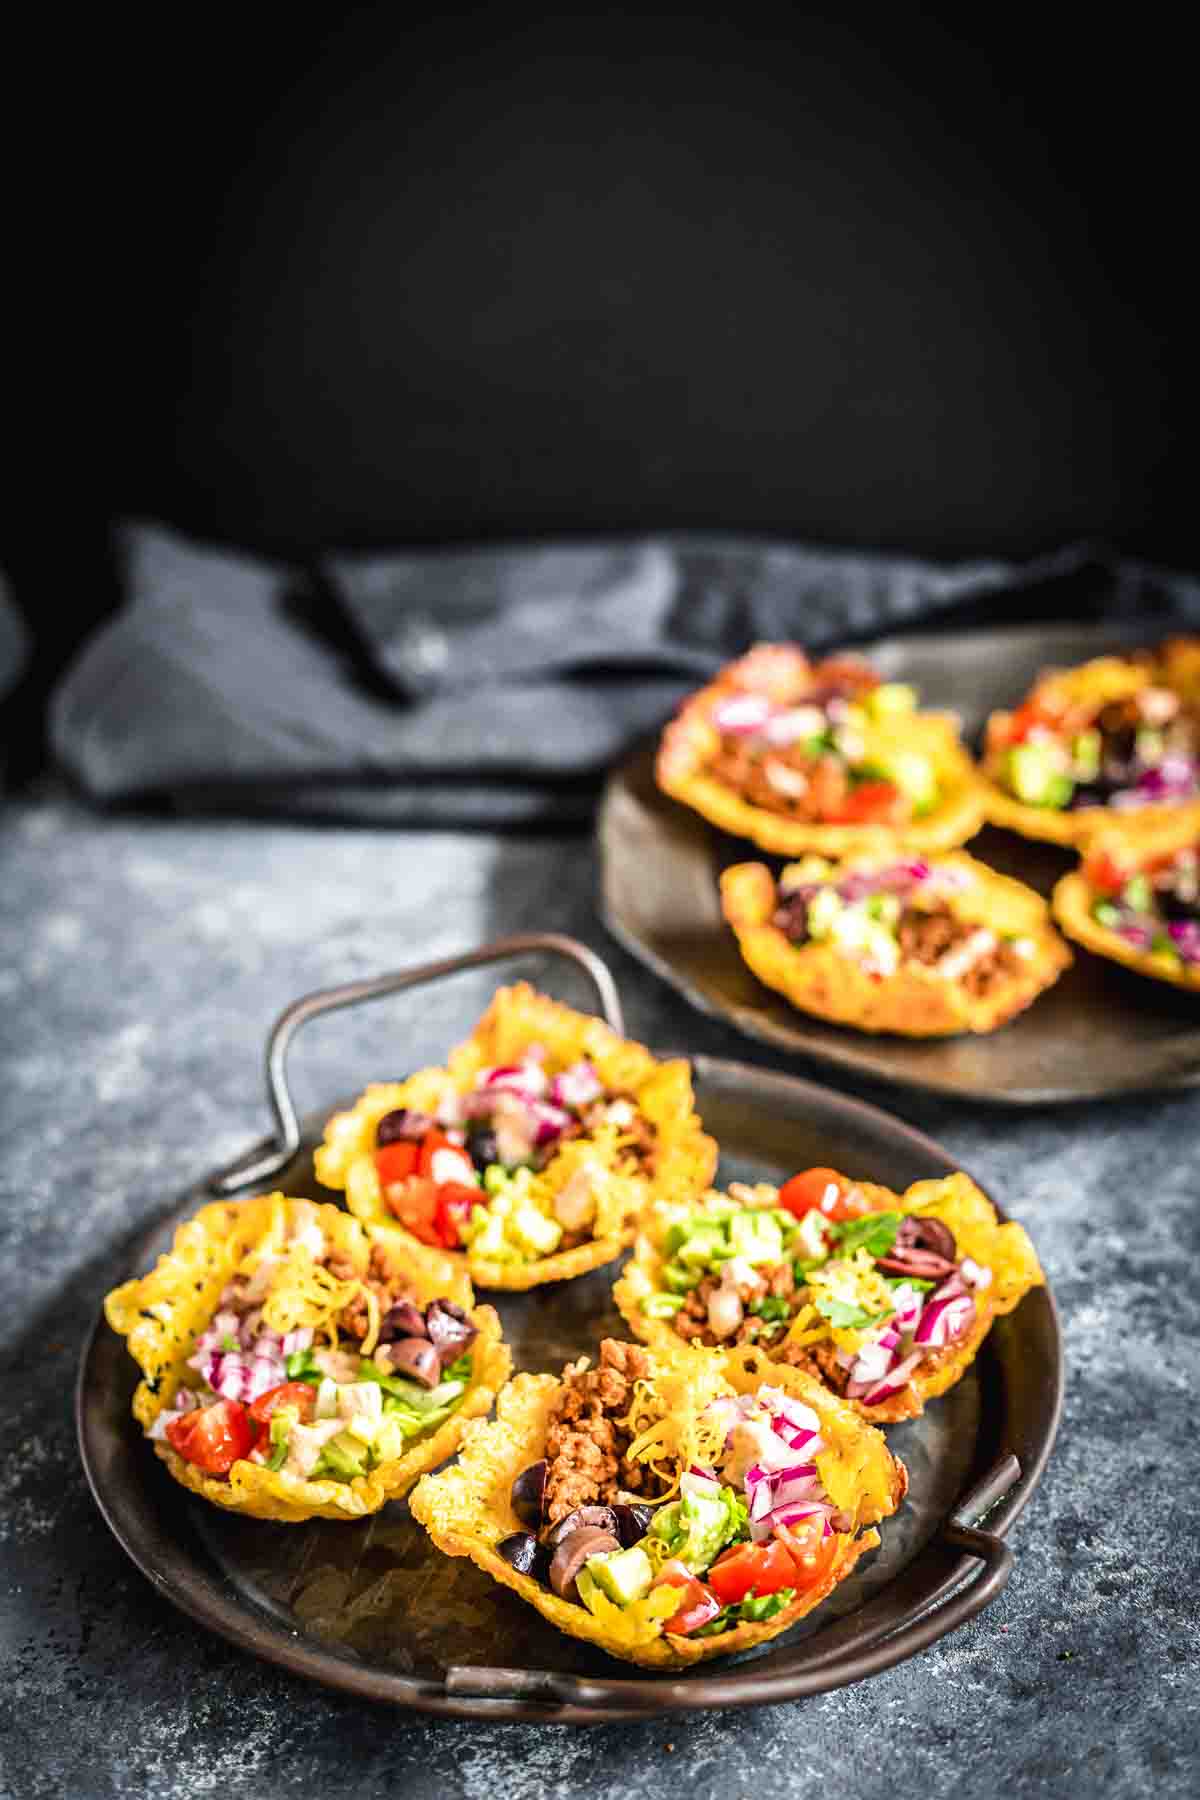
Easy Taco Toppings
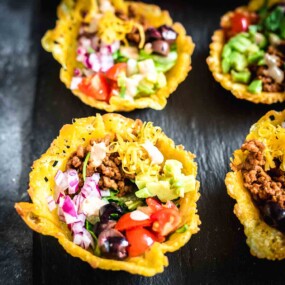
One of the best things about tacos in a cup is how easy it is to customize them. You can top them with whatever you like. My go-to toppings are shredded lettuce, diced onions, black olives, chopped tomatoes, and creamy avocado slices. Feel free to get creative.
You can also add a dollop of sour cream, some salsa, or a sprinkle of cilantro if that’s what you’re into. The possibilities are endless. The key is to keep the toppings light and fresh so they complement the crunchy taco shell and the flavorful filling inside.
Easy Instructions for Creating Crunchy Taco Cups
Must-Have Tools for Your Kitchen
- Baking Sheet: A good baking sheet is key for making those crispy taco shells. Make sure it’s large enough to fit all your cheese circles without crowding them.
- Parchment Paper: This is where you can shape the tacos. It also keeps your shells from sticking and makes cleanup a breeze.
- Muffin or Cupcake Tin: You’ll use this to shape your taco cups. Just flip it upside down and use the bottoms to create the perfect cup shape.
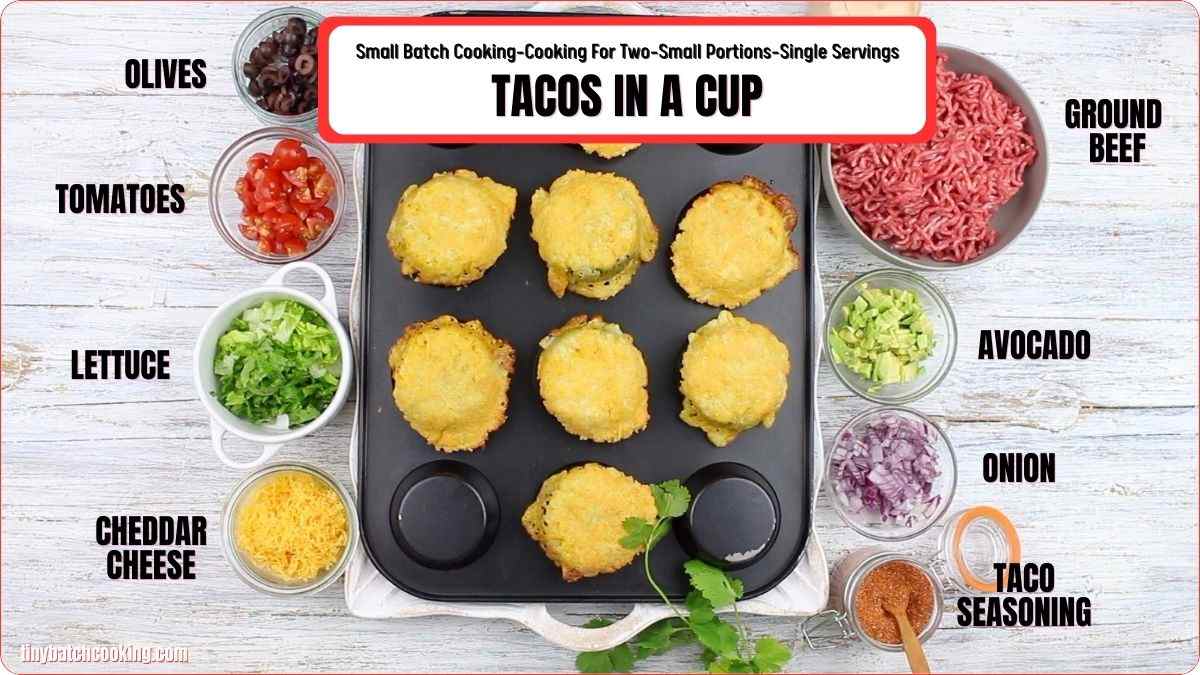
Key Ingredients:
- Mozzarella Cheese: This cheese gives your taco cups a nice, chewy texture and helps hold everything together.
- Cheddar Cheese: Cheddar adds a sharp, tangy flavor and helps make the taco shells extra crunchy.
- Protein Powder: A bit of unflavored protein powder helps the cheese hold its shape and gives the shells some extra structure.
- Ground Beef: This is the classic taco meat filling. Ground turkey can also be an option.
- Taco Seasoning: You can use store-bought or make your own blend of chili powder, cumin, paprika, and garlic powder.
- Lettuce: Shredded lettuce adds a nice, fresh crunch to your taco cups.
- Onion: A bit of diced red onion gives your tacos that classic flavor and a bit of bite.
- Black Olives: These add a salty, briny flavor that pairs perfectly with the cheesy shells.
- Tomatoes: Dice tomatoes add freshness and a little bit of juiciness to your taco cups.
- Avocado: Creamy avocado is a must-have topping for any taco. It balances out all the flavors perfectly.
*Exact measurements are listed in the recipe card below.
Detailed Directions for Tacos in a Cup
One: Prepare All Ingredients
Get everything ready before you start. Grate your cheeses, mix them with protein powder, and chop your veggies. Have your kitchen tools ready as well.
Two: Make Taco Shells
Add the cheese and protein powder to a bowl and mix well. I am using mozzarella and cheddar cheese, but you can use whatever cheese you prefer.

Three: Form the Taco Shell Mixture into Circles and Bake
Place spoonfuls on a parchment-lined baking sheet. Spread them into circles. Bake the cheese circles at 375°F until they’re golden brown and bubbly, about 5-7 minutes.

Four: Shape the Shells Using the Bottom of a Muffin Pan
Before shaping them, spray the tray with cooking spray. While they’re still warm, place each circle over the bottom of a muffin tin to form a cup shape. Let them cool and harden.

Five: Fill Taco Cups
Spoon the seasoned beef into your taco cups, and top with your favorite toppings like lettuce, tomatoes, and avocado.

Pro Tips for Best Results
- For the size, measure your muffin tops and add 1 inch. If the cups are smaller use the inside of your muffin pan.
- Use parchment paper so your cheese circles don’t stick to the baking sheet.
- Don’t overbake the cheese shells. They should be golden but still flexible enough to shape.
- Let the taco cups cool completely before adding the filling so they stay crunchy.

Common Questions Answered
What Are the Perfect Pairings for Taco in a Cup?
This recipe best pairs with our green bean mushroom casserole as an appetizer. Try them with salsa, blue cheese salad, walnut goat cheese salad, or mayo salad with chicken. They also go great with a refreshing drink like green hibiscus tea or rose tea. Onion rings chips are great on the side.
What are the Proper Storage Tips for Tacos in a Cup?
To keep your tacos in a cup fresh and crunchy, it’s best to store the components separately.
Store the baked cheese cups in an airtight container at room temperature. They’ll stay crisp for about 2-3 days. If they start to lose their crunch, you can pop them in the oven for a few minutes to crisp them up again before serving.
Place the cooked ground beef in an airtight container and refrigerate it for up to 3 days. When you’re ready to serve, reheat the beef on the stove or in the microwave until warmed through.
Keep any chopped vegetables, like lettuce, tomatoes, and onions, in separate containers in the fridge. This way, they’ll stay fresh and ready to use.

Freeze the taco filling separately. Cook the ground beef with the taco seasoning as usual. Let it cool completely, then transfer it to a freezer-safe container or resealable freezer bag. Label it with the date and store it in the freezer for up to 3 months.
Freezing Cheese Cups
Do not freeze the cheese cups. The cheese cups don’t freeze well because they lose their crispiness and can become soggy when thawed. It’s best to make these fresh when you’re ready to eat.
Additional Easy Small-Portion Recipes You’ll Love
If you enjoyed these tacos in a cup, you might want to try these other delicious small-batch recipes perfect for cooking for one or two.
Try our chicken fries, air fryer cabbage steak, crispy fried onions, and baked stuffed mushrooms. All these recipes are just the right size for when you’re cooking for yourself or with a friend. I hope you’ll try them out and find some new favorites for your tiny-batch cooking adventures.
Pin This Recipe for Later
Need Support or have Questions? Join our Free Facebook Group.
Follow us on Pinterest, Facebook, Instagram, TikTok, Flipboard, or YouTube.
For weekly New Recipes and a FREE E-Book get into our NEWSLETTER.
Printable Recipe Card
We Appreciate Your 5-Star Rating
Tacos in a Cup
Equipment
Ingredients
- 1/4 Cup Mozzarella Cheese
- 1/4 Cup Cheddar Cheese
- 1/4 Cup Protein Powder
- 3/4 Cup Ground Beef
- 1 Tablespoon Taco Seasoning
- 1/2 Cup Lettuce
- 2 Tablespoons Onion
- 2 Tablespoons Black Olives
- 1/4 Cup Tomatoes
- 1/4 Cup Avocado
- 2 Tablespoons Cheddar Cheese
Instructions
- Get everything ready before you start. Grate your cheeses, mix them with protein powder, and chop your veggies. Have your kitchen tools ready as well.
- Add the cheese and protein powder to a bowl and mix well. I am using mozzarella and cheddar cheese, but you can use whatever cheese you prefer.
- Place spoonfuls on a parchment-lined baking sheet. Spread them into circles. Bake the cheese circles at 375°F until they’re golden brown and bubbly, about 5-7 minutes.
- Before shaping them, spray the tray with cooking spray. While they’re still warm, place each circle over the bottom of a muffin tin to form a cup shape. Let them cool and harden.
- Spoon the seasoned beef into your taco cups, and top with your favorite toppings like lettuce, tomatoes, and avocado.
Notes
- For the size, measure your muffin tops and add 1 inch. If the cups are smaller use the inside of your muffin pan.
- Use parchment paper so your cheese circles don’t stick to the baking sheet.
- Don’t overbake the cheese shells. They should be golden but still flexible enough to shape.
- Let the taco cups cool completely before adding the filling so they stay crunchy.
Nutrition
Disclaimer
Please note that nutrient values are estimates only. Variations can occur due to product availability and manner of food preparation. Nutrition may vary based on methods of origin, preparation, freshness of ingredients, and other factors.