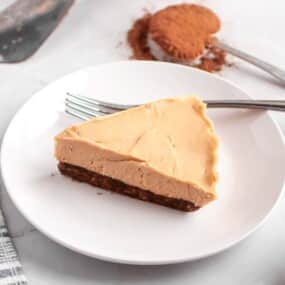
This small batch chocolate peanut butter pie is built for exactly four servings, with a baked cocoa crust that holds its shape and a creamy peanut butter filling that sets firm and slices cleanly after two hours in the fridge. The pan is what makes this pie recipe work on a small-batch scale, and that single detail changes everything.

A craving hit at 4 pm on a Sunday, and the last thing I wanted was a dessert that would feed eight people for a week. I pressed the crust into the pan, had the filling folded and smoothed within fifteen minutes, and by the time dinner was done, there was a cold, set pie in the fridge that looked nothing like something thrown together in an instant.

Pan Changes Everything
At a small batch scale, the pan size is not optional. A 6-inch pie pan gives the crust the right depth and the filling the right height to set and slice cleanly, while an 8-inch pan spreads the same quantity too thin, leaving you with a fragile crust and a filling that does not hold its shape. Make a full dessert spread with my vanilla loaf cake, strawberry sheet cake, and almond-flour mug cake.
No Oreo Crust, No Graham Crackers
This chocolate peanut butter pie skips the Oreo and graham cracker crusts entirely, using a pressed crumb of almond flour and cocoa powder. This is best to have with green hibiscus tea, on afternoons or after having some air fryer cabbage steak for dinner.
Easy Instructions for Creating Chocolate Peanut Butter Pie
This chocolate peanut butter pie uses simple ingredients. It chills for two hours, slices clean, and serves two perfectly.

Must-Have Tools for Your Kitchen
- 6-Inch Pie Pan: The correct pan size for this recipe. An 8-inch pan spreads the crust too thin and the filling too shallow, preventing the filling from setting with the right texture.
- Mixing Bowl: For the crust, the peanut butter filling, and whipping the heavy cream.
- Hand Mixer or Stand Mixer: Beats the cream cheese and peanut butter mixture smooth, and quickly whips the heavy cream to stiff peaks.
- Spatula: Presses the crust evenly into the pan and smooths the filling flat before chilling.
- Plastic Wrap: Covers the pie tightly during the two-hour refrigeration time so the filling sets without absorbing fridge odors.
Key Ingredients:
For the Crust:
- Almond Flour: The base of the chocolate cookie crust.
- Cocoa Powder: Gives the crust its deep chocolate flavor.
- Sweetener: Powdered sweetener blends into the crust more evenly than granular.
- Butter: Melted butter binds the crust mixture so it holds its shape when pressed and baked.
For the Filling:
- Creamy Peanut Butter: Natural peanut butter with separated oil can make the mixture greasy and harder to whip into a smooth consistency.
- Cream Cheese: Must be fully softened before you add the peanut butter.
- Powdered Sweetener: Granular sweetener leaves a gritty texture in a no-bake filling.
- Vanilla Extract: Rounds out the filling’s sweetness.
- Heavy Whipping Cream: Whipped to stiff peaks, then folded into the peanut butter mixture to give the filling its light, mousse-like texture.
*Exact measurements are listed in the recipe card below.
Detailed Directions for Making the Best Peanut Butter Dessert Pie Recipe
One: Make and Bake the Crust
Preheat the oven to 350°Fahrenheit (175°Celsius). Combine the almond flour, cocoa powder, and sweetener in a small bowl and stir until evenly mixed. Drizzle in the melted butter and stir until the mixture comes together and holds when pressed between your fingers. Press the crust mixture into the 6-inch pie pan, spreading it evenly across the base and a little way up the sides. Bake for 8 to 9 minutes, checking at 8 minutes as the smaller quantity can catch quickly. Remove and cool completely before adding any filling.

Two: Make the Peanut Butter Filling
Add the softened cream cheese to a mixing bowl and beat until completely smooth with no lumps. Add the creamy peanut butter, powdered sweetener, and vanilla extract, then beat again until fully combined and creamy. At this smaller quantity, the mixture comes together quickly, so keep an eye on the texture and stop once it is smooth.

Three: Whip and Fold
In a separate bowl, whip the heavy cream to stiff peaks using a hand mixer or stand mixer. Add the whipped cream to the peanut butter mixture and fold through using slow, gentle strokes with a spatula until just combined and no white streaks remain. Over-folding deflates the whipped cream and flattens the filling.

Four: Fill, Chill, and Serve
Spoon the filling into the completely cooled crust and smooth the top evenly with a spatula. Cover tightly and refrigerate for at least 2 hours before serving. This pie slices best when fully set and cold. Remove from the fridge, slice, and serve straight from the pan.

Tested and Noted by Zuzana
I also tested adding the whipped cream to the peanut butter mixture while it was still slightly warm, and the cream deflated immediately, leaving a dense filling with no light texture, which the recipe needs. Letting the peanut butter mixture cool completely to room temperature before folding in the whipped cream keeps the stiff peaks intact and gives you a decadent filling that sets properly after 2 hours in the fridge. For another dessert to make on the same day as this pie, my no-churn strawberry ice cream is worth pulling from the freezer alongside a cold slice of this pie for a full dessert spread.
- Use powdered sweetener in the filling rather than granulated. Granulated sweetener does not dissolve fully into the cream cheese at this small quantity and leaves a gritty texture in every bite.
- Make sure the crust is completely cold before spooning in the filling. A warm crust softens the bottom layer and affects the final set texture at any batch size.
- Run a sharp knife under warm water before each slice for the cleanest cuts through the filling without dragging or tearing.
- This pie makes ahead beautifully. Make it the evening before and pull it straight from the fridge when needed for the firmest, cleanest slice.

Common Questions Answered
What Are the Perfect Pairings for Chocolate and Peanut Butter Pie?
This pie pairs beautifully after a dinner of ultimate chicken casserole when you want a rich, cold dessert to finish a hearty baked meal. It also works well served alongside a bowl of homestyle chicken curry when you want a warm, spiced dinner before something cold and sweet. For a light drink to serve with this pie, a cup of rose tea adds a floral, refreshing note that perfectly balances the richness of the peanut butter filling.
Store covered in the fridge for up to 4 days. Keep plastic wrap pressed directly onto the surface of any uneaten filling to prevent it from drying out between servings. With a small batch size, the pie is easy to finish within a day or two.

How Do I Freeze This Pie?
Yes. Wrap individual slices tightly in plastic wrap and freeze for up to one month. Thaw overnight in the fridge before serving for the best texture and cleanest slice.
Additional Small-Portion Recipes You’ll Love
There are more recipes you can try apart from this dessert. Pork fillet easy recipe is a tender, flavorful dinner that makes exactly the right amount for one or two, with no leftovers to deal with. Stuffed zucchini boats is another small-batch dinner worth making on busy days.
Before serving this pie for dessert, my veggie casserole with bacon is a creamy, flavorful option that pairs naturally with a rich, cold dessert to finish the meal.
Pin This Recipe for Later

Need Support or have Questions? Join our Free Facebook Group.
Follow us on Pinterest, Facebook, Instagram, TikTok, Flipboard, or YouTube.
For weekly New Recipes and a FREE E-Book get into our NEWSLETTER.
Printable Recipe Card
We Appreciate Your 5-Star Rating
Small Batch Chocolate and Peanut Butter Pie
Equipment
- 1 6-Inch Pie Pan
- 1 Hand Mixer or Stand Mixer
- 1 Spatula
- 1 Plastic Wrap
Ingredients
For the Crust:
- ¾ Cup Almond Flour
- 2 Tablespoons Cocoa Powder
- 2 Tablespoons Sweetener
- 2 Tablespoons Butter melted
For the Filling:
- ½ Cup Creamy Peanut Butter
- 4 Ounce Cream Cheese softened
- ¼ Cup Powdered Sweetener
- ½ teaspoon Vanilla Extract
- ½ Cup Heavy Whipping Cream
Instructions
- Preheat oven to 350°Fahrenheit (175°Celsius). Mix almond flour, cocoa powder, sweetener, and melted butter, press into a 6-inch pie pan, and bake 8–9 minutes. Cool completely.
- Beat cream cheese until smooth, then mix in peanut butter, sweetener, and vanilla until creamy.
- Whip heavy cream to stiff peaks and gently fold into the peanut butter mixture until combined.
- Spread the filling into the cooled crust, refrigerate at least 2 hours, then slice and serve cold.
Notes
- Use powdered sweetener in the filling rather than granulated. Granulated sweetener does not dissolve fully into the cream cheese at this small quantity and leaves a gritty texture in every bite.
- Make sure the crust is completely cold before spooning in the filling. A warm crust softens the bottom layer and affects the final set texture at any batch size.
- Run a sharp knife under warm water before each slice for the cleanest cuts through the filling without dragging or tearing.
- This pie makes ahead beautifully. Make it the evening before and pull it straight from the fridge when needed for the firmest, cleanest slice.
Nutrition
Disclaimer
Please note that nutrient values are estimates only. Variations can occur due to product availability and manner of food preparation. Nutrition may vary based on methods of origin, preparation, freshness of ingredients, and other factors.
more desserts to make
Other desserts you can make can add variety to any menu while keeping things simple and enjoyable. Choose from baked, chilled, fruity, creamy, or no-bake treats to suit different tastes and occasions.